

 1 of 1
- ncore
- New Member
 Offline
 - Registered: 24-9-2014
- Posts: 12
Tutorial/Guide: Slug and Typebars Cleaning and gunk removal
Intro:
With every strike of a key, as you know, a metal arm with a character inprint hits inked cloth up against paper, leaving behind a letter to tell the tale.
As time goes on while the typewriter is in use, as the typebar leaves it's mark behind on the paper, it picks up a mark as well. Some of the ink from the ribbon latches onto the typebar, which results in absorption of loose ribbon fibers and dust. Slowly but surely, a thick black gunk forms around slug, much like carbon buildup of a firearm.
This buildup of gunk won't destroy your typewriter, but if it builds up too much it can cuase problems such as:
-Segments sticking to the ribbon
-Segments sticking to other segments while at rest in the segment tray
-Dull print or illegible characters
-Wasted ink
What you need:
1. Strong, non-flaking paper towel:
If it flakes (shreds with debris), it will create dust which you don't want in your typewriter. If you don't have anything else, then use scizzors to cut the paper towel to minimalize the flaking.
2. Two sided plastic thistle brush. A toothbrush won't cut it. You want something with really tough bristles; one set big, one set small. The small end should have bristles no longer than half a centimeter. An example of an ideal brush would be the brush that comes with the U.S. military's standard issue weapons cleaning kit. That is what I used.
3. Metal Tweazers. The smaller and sturdier the better. If you have finicky hands I would skip using them. The tweezer's only purpose is to minimize the ammout of residue that could fall into the typewriter.
4. Braces cleaners. small pipe cleaner would be a suitable alternative. I happily shared my tooth cleaning instruments with my typewriter.
5. Open and clean work environment. Should have good lighting or else use a worklight. Give yourself lots of arm room. Do not do this on a cluttered desk. If you have a small corner table, that is prefered. If your desk has a pull out writing board that isn't wide, that works too (that is what I used). Ideally, you want your work table no more than 4-6 inches wider than your typewriter. This way the desk will not be in your way when you move your arms around.
6. Shorts or pants with a hole on the side of the dominant hand. If you are right handed the hole would be on your right side. The reasoning for this as a necessity will be explained later on in the guide.
The cleaning:
Prep:
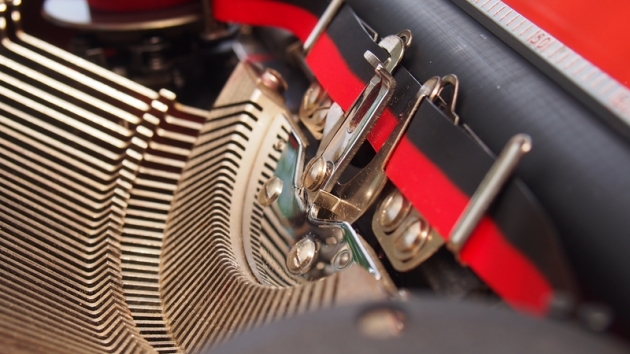
First, prepare your workspace and materials. Take some paper towel and cut or rip it into small squares no bigger than an inch and a half long. You should have 10-15 of these. Then take another piece of paper towel and cut it into a slight arch so that it fits over the typebars just under the slugs. This will protect the segments from gunk and debris while cleaning. Remove the typewriter's cover (if applicable) and fit the paper towel segment 'protector' in place.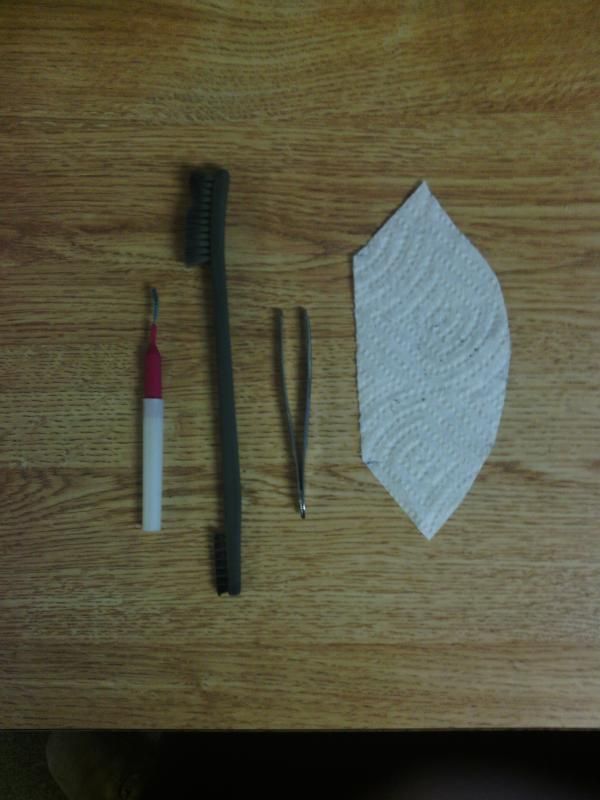
(Above: Required cleaning instruments with paper towel protector on the right)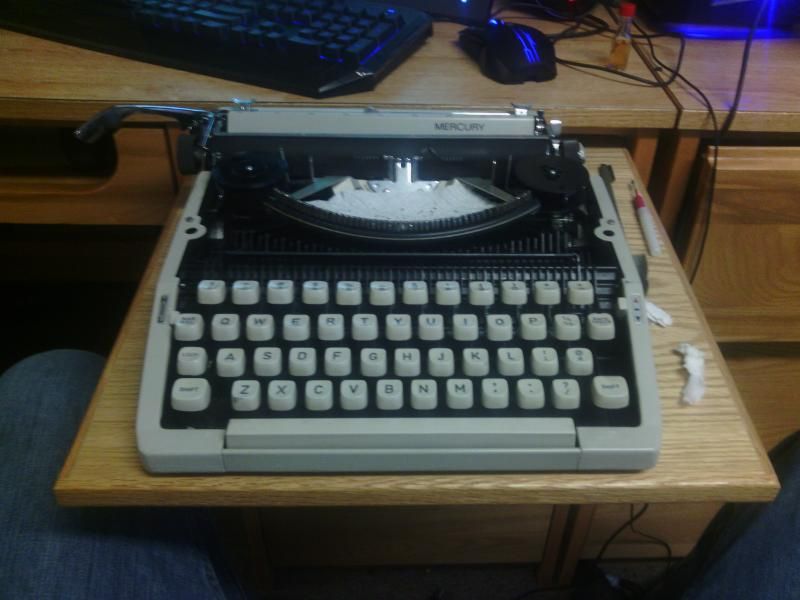 (Above: A roomy workspace with lots of arm room is ideal)
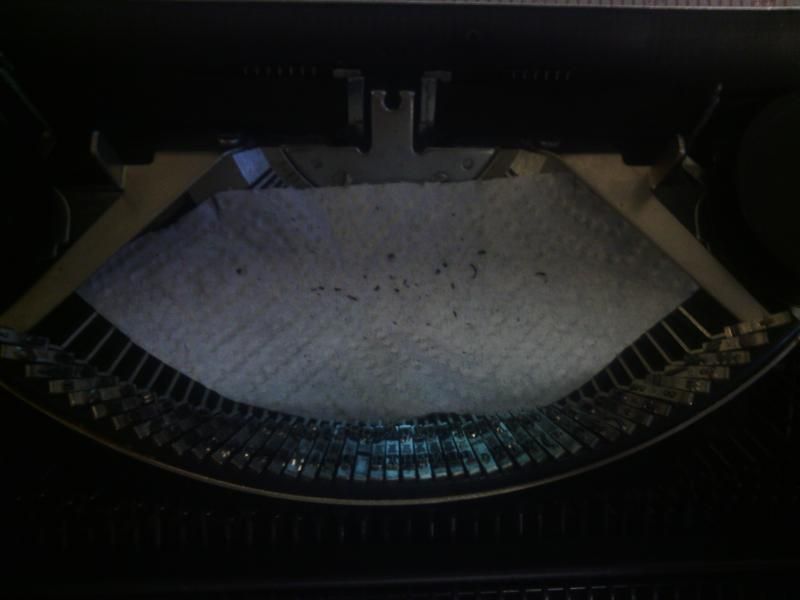 (Above: Placement of the paper towel protector atop the segments. Note the protector's ability to catch debris)
The entire process will be done one segment at a time, working from right to left (or left to right)
1. With tweezers in the dominant hand, lift up the first segment and hold it so it can be worked on. Holding the typebar up anywhere from a 65-90 degree angle is idea. You should be able to see the slug and be able to reach both sides. Take the tweezers and try to pinch and remove whatever gunk you can. Once the gunk is on the tweezers, you do not have to keep sqeezing; the gunk isn't going anywhere on its own.
(Now here comes the amazing part)
Take the tweezers, stick them into the hole in your pants (refer to picture), close the tweezers lightly and pull out. The gunk will now be on your pants. Using a pair of pants with holes is much easier and faster than pulling out a cloth to put the gunk on.
(Above: Proper usage of a ripped pantleg.)
2. After you got as much gunk as you could with the tweezers; go back and forth between using the fine end of the brush and the braces brush to clear the remaining gunk out. Be sure to scrape downward more than scraping upward with the brush. The gunk particles will go into the air if you scrape upward, but if you scrape downward they will settle in the paper towel protector you made and placed. Do not be afraid to scrub hard with the little brush. As long as you brush straight up and down and NOT side to side; and as long as you hold the typebar firmly; you will not hurt the keyboard.
3. When you think you are finished with the small tough brush and the braces brush, use the long gentler brush to wipe the slug a few times.
4. When you are sure all the gunk is removed, there will still be black 'carbon-like' residue all over the end of the typebars. Take a paper towel cutting and gently wipe the slug, and then the sides of the typebar.
Repeat steps 1-4 for each typebar until they are all finished
5. Remove the paper towel protector without spilling the collected flakey gunk residue into the typewriter.
6. Remove or disable the ribbon. We are going to test each key without interference.
7. Feed a blank piece of paper into the typewriter.
8. Go through every single key: Pressing and holding one key at a time in for 1-2 seconds twice, then strike the key rapidly 5-7 times. Take note of any typebar that sticks.
9. Find the segment opening of each key that stuck and stick the braces cleaner in the bottom of the opening just above the arm and sweep upward. You may have to do this more than once per stuck key. If the segment still sticks, you will probably have to apply denatured alcohol to the segments. There are plenty of guides and tutorials out there on the web that discuss this process.
And that is it. If you had keys sticking together or dull/illegible prints, hopefully the propblem is now fixed.
Last edited by ncore (24-9-2014 23:27:40)
- Uwe
- Moderator
Offline

- From: Toronto, Canada
- Registered: 12-3-2013
- Posts: 4,408
Re: Tutorial/Guide: Slug and Typebars Cleaning and gunk removal
Glad to see you getting into typewriter maintenance. Cleaning a machine's slugs is one of the easiest tasks for a typewriter owner to perform, and for some of us it's actually a relaxing activity. There are many, many methods for cleaning a machine's slugs, and everyone has their preference. Personally, I use toothpicks to quickly pick out the major material out of each character, and then use Q-tips soaked in a cleaner to make them look like this:
Just for your reference:
1. What you call "strikers" are slugs.
2. "Striker arms" are typebars.
3. You should never use anything metal to clean a slug - especially not a pin - as you risk damaging the slug.
4. The "arm hole" is known as the segment.
5. You should never oil or lube the segment (there are few exceptions to this rule).
The pronoun I has always been capitalized in the English language for more than 700 years.
- ncore
- New Member
Offline
- Registered: 24-9-2014
- Posts: 12
Re: Tutorial/Guide: Slug and Typebars Cleaning and gunk removal
Uwe wrote:
-snip-
Thank you very much for the input. I made appropriate changes to the original post accordingly.
- •
