

| Portable Typewriters » Atypical QWERTY? » 02-5-2024 17:27:37 |
- robmck
- Replies: 5
-
Saw this Splendid 66 pop up today: (2) Olympia Splendid 66 Typewriter Auction (liveauctioneers.com).
It has a QWERTY keyboard with Ä, Ö, Ü, ß, and a `/´ dead key.
Is this a German QWERTZ that someone swapped the Z and Y, or some other keyboard layout? (I don't see it in the NOMDA book on the TWDB).
| Maintenance & Repairs » Detached slug solder... » 02-5-2024 17:19:12 |
- robmck
- Replies: 21
-
Thanks, Tom.
The only thing I've ever soldered is electronics with good old rosin-core solder, so I'm new to having the flux separate.
For typebars/slugs, is the process that you put paste on both the bar and the slug separately before you put them together? (Then heat it all up and add solder once the flux is bubbling).
For cleaning off old solder beforehand, would a solder wick work just like in electronics?
Thanks!
| Typewriter Paraphernalia » Ribbon comparison » 30-4-2024 17:09:52 |
- robmck
- Replies: 6
-
 skywatcher wrote:
That's where a pair of latex or vinyl examination gloves come in really handy (pardon the pun). Put the gloves on, do your ribbon work, take the gloves off and hands still clean.
Amusingly, I was wearing nitrile gloves (just as when I'm working the car) when I did this, and having those gloves on made some part of my brain go, "Well, since I've got gloves on, my hands are clean no matter what, so I don't have to wipe them after changing a ribbon" - hence all the smudges and my having to frequently wipe the keycaps off...
| Typewriter Paraphernalia » Ribbon comparison » 28-4-2024 21:37:27 |
- robmck
- Replies: 6
-
Feeling a bit too under the weather today to attempt ring/cylinder and motion adjustments on my Parade, I decided to do something that I've wanted to do for a long time: compare silk, nylon, and cotton ribbons on a number of my machines.
The results are below. Each of the ribbons is from Ribbons Unlimited and freshly opened for this experiment. The paper is Hammermuehle A4 20lb laser printer paper (it's what was on-hand).
In general, as others on this forum have pointed out, silk outshines nylon. It is interesting, though to see how very differently the three behave on each machine. I do like the way cotton shows on pica and tend to use that on most of my pica machines, even though it requires more type slug cleaning. I'd not tried silk before today.
And please excuse all the smudges and increasing mistakes as it goes along. Perhaps I should've stayed in bed and attempted this another day...
(click to get to the full resolution scan)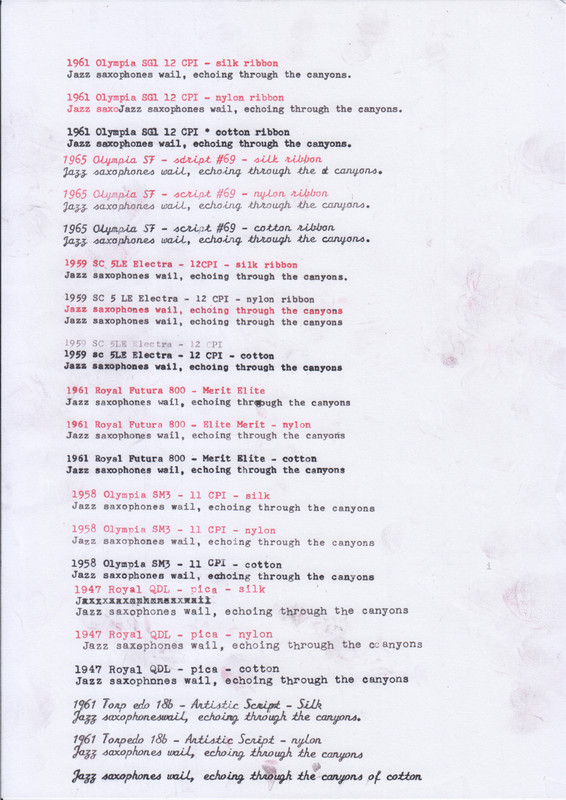
| Portable Typewriters » Royal Parade ribbon lift » 28-4-2024 10:15:58 |
- robmck
- Replies: 29
-
Laurenz van Gaalen wrote:
The on feet and motion adjustments on my Halbergs were the most difficult I have ever done.
Thanks, that's validating. I found it very frustrating getting the adjustments made so far, so was not looking forward to doing it again.
Laurenz van Gaalen wrote:Please note that I did the adjustments with trial and error and without proper documentation. Maybe the Royalite Repair Bible offers some insights that are of help.
Unfortunately, for on-foot & motion, the Repair Bible only really points out where the eccentrics are and to remove the cover before adjusting.
Laurenz van Gaalen wrote:Fun fact and maybe good to know: on two of my Halbergs I discovered a dedicated ring to cylinder adjustment in the form of one or two thin brass plates that were mounted behind the ring/type guide.
Yes, this is exactly it. The Repair Bible says to adjust shims accordingly, and if the impression is still not correct after removing the last of the shims, there are a couple of eccentric screws on the carriage fulcrum (right next to where the fulcrum contacts the motion stop on the frame). It goes on to note that adjusting those eccentrics affects the escapement trip point, bi-chrome, writing line, motion and margin stop adjustments.
Well, that sounds like an afternoon's worth of tinkering. Hopefully, I don't have to touch those eccentrics.
If nothing else, this typewriter seems to be a good learning opportunity (sort of an apprentice's exam)...
| Portable Typewriters » Royal Parade ribbon lift » 27-4-2024 15:29:38 |
- robmck
- Replies: 29
-
Laurenz van Gaalen wrote:robmck wrote:
Now I'm trying to understand why the lowercase impression is much lighter than the caps, even though the ribbon is now correctly placed in both positions. The caps looks to be on-foot, and the lowercase is aligned with it, but the lowercase barely touches the paper. Will look at ring & cylinder, but I would expect that to effect both positions equally.
Hi Rob,
The issue you describe may have to do with how the Royalite on-foot adjustment works. On most typewriters the on-foot adjustment screws move the carriage up or down. Because the Royalite uses concentric nuts for the adjustment, the carriage is not only moved up or down, but also forward and backward.
Interesting. Thanks, Laurenz. That explains why the angle of motion seems to be wrong. It sounds like a system of many variables.
I also notice that with the motion adjusted as I have it now, the caps sit lower than the caps-lock will go (the lock bracket is as far down as it will go). Perhaps that's a hint that the whole thing is in the wrong place.
Is there an approach you'd recommend?
I wonder if I should ignore the caps for now, get ring & cylinder and on-foot set for the lowercase, then bring the caps in to match (hoping that it lands where the caps-lock can be set to)...
| Portable Typewriters » Royal Parade ribbon lift » 27-4-2024 13:56:11 |
- robmck
- Replies: 29
-
Thanks, Pete.
I tried that, but it didn't help much.
Looking at my machine and yours in the photos, I notice that the front, vertical part of the drive shaft on yours angles slightly more downward than the back half of the shaft, and on mine, angled upward. So, I gave it a slight bend in the middle, and now it's working fine.
Now I'm trying to understand why the lowercase impression is much lighter than the caps, even though the ribbon is now correctly placed in both positions. The caps looks to be on-foot, and the lowercase is aligned with it, but the lowercase barely touches the paper. Will look at ring & cylinder, but I would expect that to effect both positions equally.
| Portable Typewriters » Royal Parade ribbon lift » 25-4-2024 11:20:12 |
- robmck
- Replies: 29
-
Thanks, Pete! This helps a lot. It confirms what I thought the problem is: on my machine, at rest in lowercase, the universal linkage sits in the middle, in the 45 degree part of the slot, so when it starts to move, it goes down first.
From your photos, it looks like the bar angles down somewhat, certainly more than mine, and may have a slight angle in the end piece vs the rest of the shaft.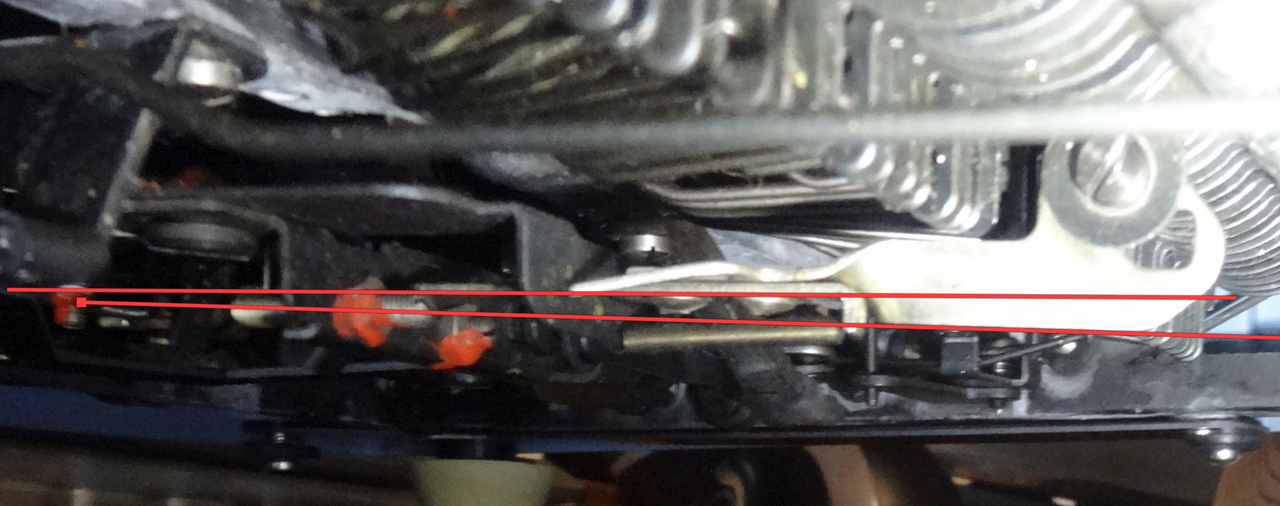
I'll go look around mine a bit more in comparison. I don't want to start bending things if I can avoid it.
| Maintenance & Repairs » Detached slug solder... » 24-4-2024 12:30:43 |
- robmck
- Replies: 21
-
Here's a video on soldering type slugs: Typewriter Soldering QWERTY Swap- Shim Method- Step by Step Tutorial (youtube.com)
Here's Mary at myoldtypweriter doing some soldering: Old Dog, New Tricks – myoldtypewriter
| Portable Typewriters » Royal Parade ribbon lift » 24-4-2024 12:19:23 |
- robmck
- Replies: 29
-
Thanks Pete! Mine has all the same parts. I tried lengthening and shortening the drive bar with the screws from photo 4, but it didn't really do anything.
When your machine is in lowercase, and you type, does it stay in the upper position in the slot and immediately start pulling the drive bar, or does it move down to the lower (caps) position before pulling? (I know this is really awkward to see since the carriage lift springs pull the carriage up to caps position when the typewriter isn't flat.
Could you also shoot a picture from the side of this assembly? I'm curious if the black support arm (you can see at the bottom of photo 4) is lower in the machine, or if the drive bar points higher up. I've wondered if the back end of the drive bar on mine is riding too low, thus pushing the universal side of the bar too high.
Another thought that comes to mind: my spring does have a single, stretched turn in it - I wonder if the spring tension is out of spec. Time to dig through my springs jar...
